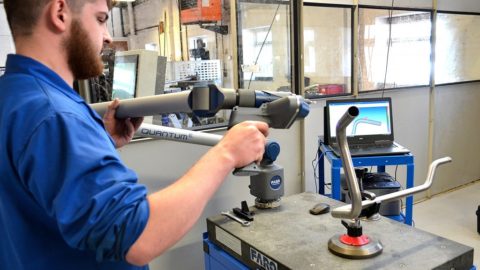
Manufacturing intricate pipeline products for a range of demanding industries is challenging enough but guaranteeing their quality to tight tolerances is another ballgame entirely. Fortunately for Alltube Engineering, Faro came to the rescue. PES reports.
Daventry, Northamptonshire-based Alltube Engineering manufacture a comprehensive range of flexible and rigid pipeline products.
Established in 1986 as part of a small group, since becoming a privately-owned business in 2007, Alltube Engineering has significantly increased its output in the areas of tube and pipe manipulation and fabrication and also boosted its hydraulic and pneumatic hose assembly activities.
The company serves a diverse UK customer base that operates across a range of industries, including the agriculture, construction, bus, trucks and rail sectors. Alltube’s in-house technical expertise means that it is able to work closely with customers in the areas of prototyping, product development and support through to full scale production.
To help ensure its products’ ease of installation and performance, the ISO9001:2015 approved company administers a rigorous quality management system. As many of the company’s rigid pipes are designed to be installed in confined areas and to pass through relatively small spaces, they feature extremely intricate, freeform 3D shapes and have demanding dimensional and geometrical tolerances.
In addition to other quality control tools, Alltube use a fixed coordinate measuring machine (CMM) to inspect its products and to generate customer quality reports. although, the sheer size and complex shapes of many of the company’s larger tubes and pipes render fixed CMM, tactile probing measurement techniques impossible to use.
In an effort to find a flexible means of accurately measuring the company’s product ranges, including its previously difficult to inspect large, complex pipes and tubes, Alltube technical director, Paul Fuller, recently searched for a suitable, large capacity, high-precision solution.
Manufacturing challenges
Having considered other options, following an in-depth demonstration, Mr Fuller decided that the Faro QuantumE ScanArm was the ideal solution to the company’s inspection needs. Not only did the QuantumE have the required capacity, accuracy and speed and ease of use, it was able to link to the company’s CNC bending machines.
“Alltube has a long established reputation as a major supplier of flexible and rigid pipeline products to many of the UK’s leading OEM’s, across a wide variety of markets,” he explains. “Between them, our directors have over 100 years of in-depth experience in engineering. This accumulated knowledge has resulted in our flexible approach and our ability to supply customers, ranging from SMEs, through to major international organisations, with the best possible solutions and to deliver a reliable, cost-effective service.
“A major problem we have is that the fitting of ridged pipework such as hydraulic pipes is rarely considered when customers undertake new projects such as the design of commercial vehicles or buses. Therefore, we are often supplied with finished vehicle designs and then challenged to create relatively long, convoluted hydraulic pipe runs that will avoid obstructions and pass through the most limited of spaces. Also, they must not rub on areas such as vehicle chassis or interfere with any of the vehicles moving parts.”
He continues: A vitally important aspect of our products is that many of our hydraulic pipes play a critical role in vehicle braking systems so it is extremely important that, to prevent pipe abrasion and eventual failure, they are manufactured in such a way that no unintentional contact and chaffing occurs with vehicle parts.
“Achieving optimum 3D pipe shapes is never easy as for instance a pipe bend with a small angular error at one end can result in an inaccuracy of several millimetres at the opposite end of a long pipe. Hence, to satisfy the challenging briefs that are often given to us, our designs often feature demanding 3D geometric forms with tight dimensional and geometrical tolerances. To ensure that each manufactured hydraulic pipe adheres to the required design specification, we thoroughly inspect each product before despatch.
“As the use of physical measuring devices for inspecting rigid pipes is both cumbersome and very long winded, we recently investigated the available non-contact measuring systems,” Mr Fuller explains.
Portable benefits
A practical demonstration of a Faro QuantumE ScanArm, fitted with FaroBlu Laser Line Probe SD, measuring a selection of Alltube’s most testing products proved to the company that it was the ideal answer to its inspection problems. Not only was the Faro ScanArm much quicker and easier to use, it proved more accurate than previously used inspection methods.
“It was also able to link to our CNC pipe bending machines and automatically generate comprehensive customer inspection reports. Last, but not least, the QuantumE FaroArm FaroBlu LLP combination is capable of both contact and non-contact measurement. By using the ScanArm’s advanced 3D laser scanning capabilities, we have reduced our inspection times by approximately 90%, and by extension reduced our delivery times.
“Since using the QuantumE, in addition to being employed on our pipe inspection routines, we have found many further uses for it, including undertaking previously difficult to achieve, precise reverse engineering applications,” he adds.
“Also, unlike our static CMM, it is useful that the QuantumE is portable and quick to set up. Therefore, besides being used throughout our inspection and production departments, we are able to take it to our customers’ premises to perform our important onsite measuring tasks.”
The FaroArm is a leading Portable Coordinate Measuring Machine (PCMM) that allows manufacturers easy verification of product quality by performing precise 3D inspection, tool certification, CAD comparison, dimensional analysis and reverse engineering.
Available in three different models with varying accuracy specifications, Faro claims its Quantum FaroArm is the first arm on the market that can be verified against the stringent international certification standard for articulated arm coordinate measuring machines – ISO 10360-12:2016.